Introduction
Precision in timekeeping is crucial for numerous applications, from scientific experiments to network operations. Relying solely on public NTP servers can introduce variability and dependency on internet connectivity. By using a Raspberry Pi and a GPS module, you can create an independent, high-precision time source for your local network.
Personal Motivation
As a tech enthusiast, precision and reliability in data are paramount to me. Setting up my own time server using a Raspberry Pi and a GPS module not only provided the accuracy I needed but also offered a fascinating project to dive into. This guide is based on my successful implementation, providing a detailed roadmap for you to follow. This setup works fine for me since many months and since I now have microsecond-precision, I can do time critical calculations like MLAT tracking for airplanes or lightning detectors.

Project Overview
Required Components
- Raspberry Pi 3B+ - or similar device, a Raspberry Pi Zero also works well
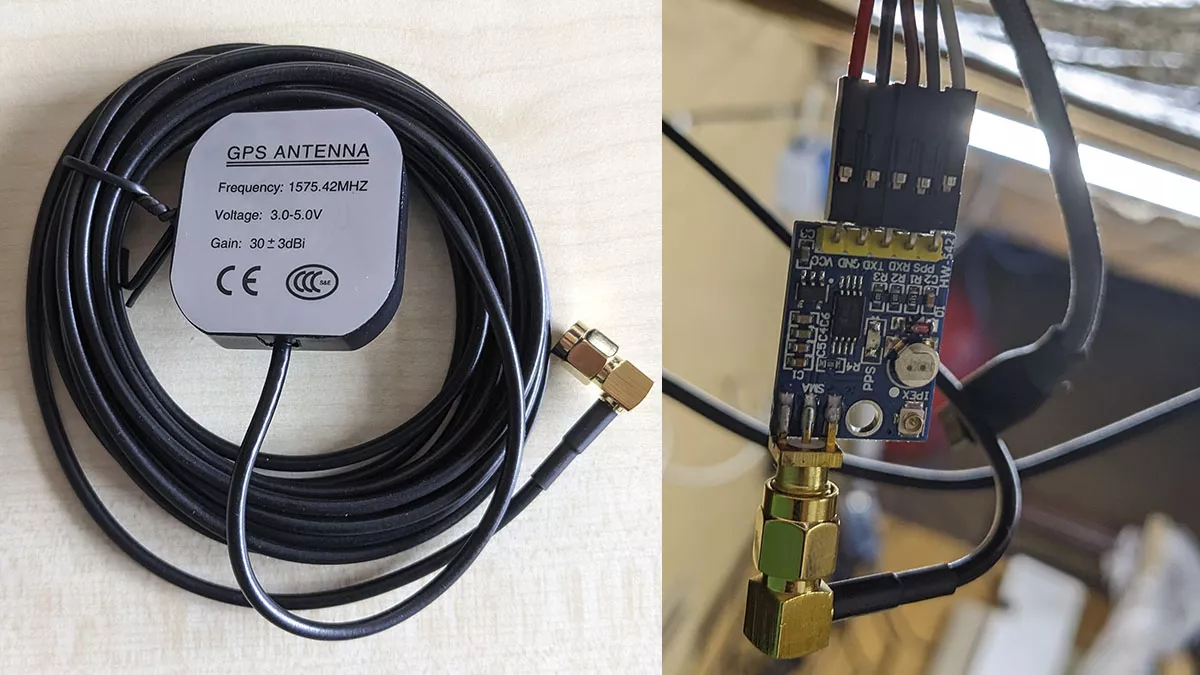
- GPS Module (u-blox NEO-6M) - Ideally a board with this module which provides a convenient PPS (Pulse Per Second) header and SMA connection for a GPS antenna, but if you have the skills you can also solder this yourself
- GPS Antenna - Positioned on my rooftop skylight for optimal reception, most outdoor antennas will also work fine.
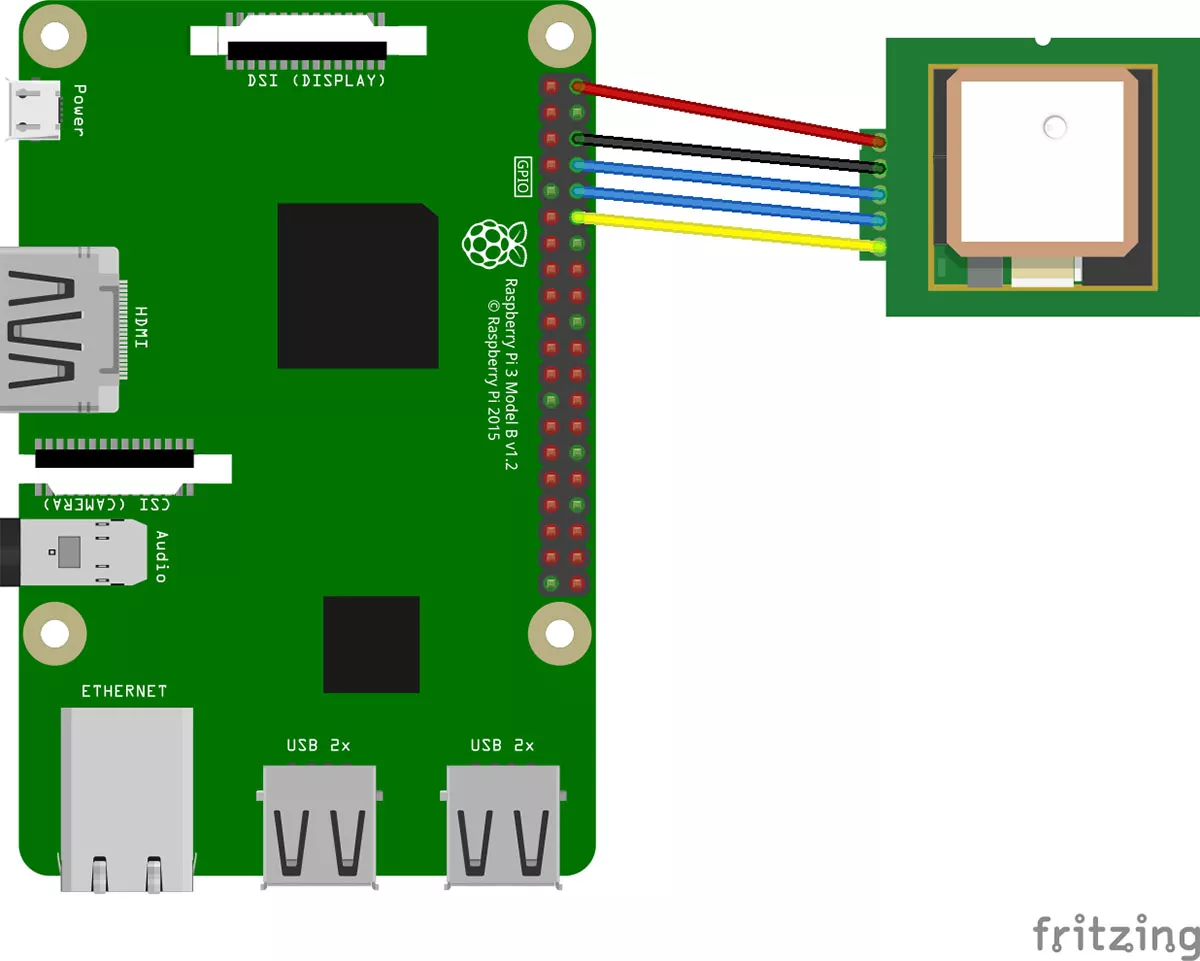
Hardware Connections
To ensure proper communication between the GPS module and the Raspberry Pi, make the following connections:
- GPS Module VCC: Pi Pin 2 (+5V, works more stable than using 3.3V)
- GPS Module GND: Pi Pin 6, 9 or 14 (GND)
- GPS Module RX: Pi Pin 8 (UART TXD0)
- GPS Module TX: Pi Pin 10 (UART RXD0)
- GPS Module PPS: Pi Pin 12 (GPIO18: PCM CLK)
Make sure the Module RX is connected to the Pi's TX and vice versa, so they can communicate correctly. Because when the Pi sends something (TX) the module needs to receive it (RX).
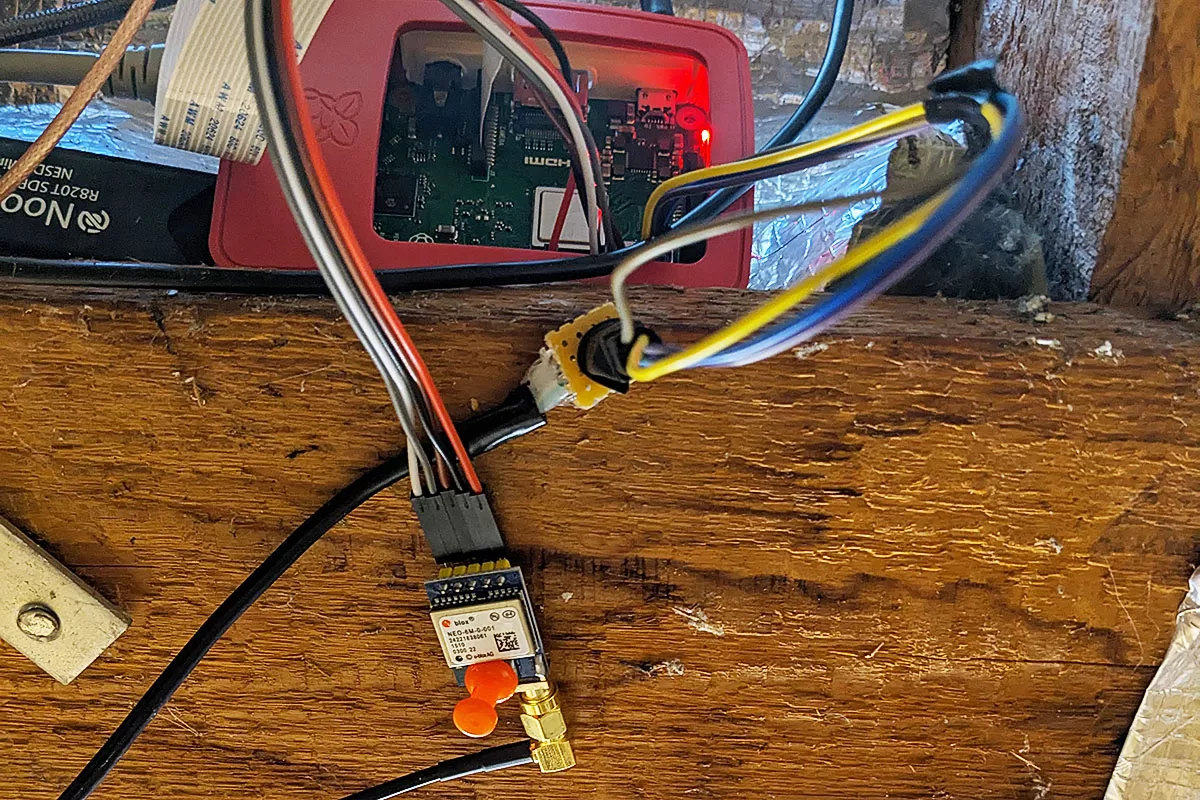
My temporary test installation then looked like this:

Software Installation and Configuration
Installing gpsd
gpsd is a service daemon that monitors one or more GPSes attached to a host computer through serial or USB ports, making them available to be queried on TCP port 2947. The default repository version was outdated in my case, so we manually install the newer packages:
wget http://archive.raspberrypi.org/debian/pool/untested/g/gpsd/libgps29_3.24-1~rpt1_armhf.deb
wget http://archive.raspberrypi.org/debian/pool/untested/g/gpsd/gpsd_3.24-1~rpt1_armhf.deb
wget http://archive.raspberrypi.org/debian/pool/untested/g/gpsd/gpsd-clients_3.24-1~rpt1_armhf.deb
wget http://archive.raspberrypi.org/debian/pool/untested/g/gpsd/gpsd-tools_3.24-1~rpt1_armhf.deb

sudo dpkg -i libgps29_3.24-1~rpt1_armhf.deb
sudo dpkg -i gpsd_3.24-1~rpt1_armhf.deb
sudo dpkg -i gpsd-tools_3.24-1~rpt1_armhf.deb
sudo dpkg -i gpsd-clients_3.24-1~rpt1_armhf.deb
My Raspberry Pi 3B+ runs Raspbian 11 bullseye, so the repository only provides 3.22, but for newer NEO-6M modules you need at least 3.24 as it is discussed in the Raspberry Pi Forums: GPSD version 3.22 does not function correctly with some Ublox gps units
Configuring gpsd
Edit the /etc/default/gpsd file to configure gpsd to use the serial connection:
# Devices gpsd should collect to at boot time.
# They need to be read/writeable, either by user gpsd or the group dialout.
DEVICES="/dev/ttyS0"

# Other options you want to pass to gpsd
GPSD_OPTIONS="-n"
START_DAEMON="true"

# Automatically hot add/remove USB GPS devices via gpsdctl
USBAUTO="false"
Enable the gpsd service and restart the Raspberry Pi:
sudo systemctl enable gpsd.service
sudo reboot
Check the status of the service to ensure it’s running correctly, like it does in my case:
sudo systemctl status gpsd.service

● gpsd.service - GPS (Global Positioning System) Daemon
     Loaded: loaded (/lib/systemd/system/gpsd.service; enabled; vendor preset: enabled)
     Active: active (running) since Mon 2024-07-22 16:20:00 CET
You can now start a GPS client to display the received data:
cgps localhost:2947

┌───────────────────────────────────────────┐
│ Time         2024-07-22T16:20:42.000Z (18)│
│ Latitude          50.28xxxxxx N           │
│ Longitude          8.93xxxxxx E           │
│ Alt (HAE, MSL)     197.258,    149.934  m │
│ Speed              0.03              km/h │
│ Track (true, var)     286.1,   2.7    deg │
│ Climb             -0.90             m/min │
│ Status          3D FIX (1 secs)           │
│ Long Err  (XDOP, EPX)   0.59, +/-  8.9 m  │
│ Lat Err   (YDOP, EPY)   0.64, +/-  9.6 m  │
│ Alt Err   (VDOP, EPV)   1.84, +/- 42.3 m  │
│ 2D Err    (HDOP, CEP)   0.88, +/- 16.7 m  │
│ 3D Err    (PDOP, SEP)   2.04, +/- 38.8 m  │
│ Time Err  (TDOP)        1.05              │
│ Geo Err   (GDOP)        2.30              │
│ Speed Err (EPS)            +/-  1.2 km/h  │
│ Track Err (EPD)         n/a               │
│ Time offset             0.128376861     s │
│ Grid Square             JO40xxxx          │
│ ECEF X, VX    4030000.100  m   -0.010  m/s│
│ ECEF Y, VY     630000.100  m   -0.010  m/s│
│ ECEF Z, VZ    4880000.100  m   -0.010  m/s│
└───────────────────────────────────────────┘
This command displays a handy info box along with real-time GPS data, confirming that the GPS module is functioning as expected. You can exit via "Ctrl + C". It's important that you get a 3D Fix with a small error rate. This ensures we have a good connectivity with the GPS / GNSS satellites and receive plenty of them all the time.

Utilizing the PPS Signal
Installing and Enabling the PPS Module
The PPS (Pulse Per Second) signal is essential for achieving high-precision timekeeping. Install the PPS tools:
sudo apt install pps-toolsEnable the PPS GPIO module by adding the following line to /boot/config.txt:
dtoverlay=pps-gpioAnd add this to /etc/modules:
pps-gpioReboot the Raspberry Pi and verify that the PPS module is active:
lsmod | grep ppsThis should return a few lines including "pps_gpio".
Now we can test the PPS interface, which is available at /dev/pps0:
sudo ppstest /dev/pps0

trying PPS source "/dev/pps0"
found PPS source "/dev/pps0"
ok, found 1 source(s), now start fetching data...
source 0 - assert 1721653175.000005483, sequence: 22800085 - clear  0.000000000, sequence: 0
source 0 - assert 1721653176.000006907, sequence: 22800086 - clear  0.000000000, sequence: 0
This test will show a pulse every second, confirming that the PPS interface is working correctly. You can also end this again via "Ctrl + C".

Configuring NTP for High-Precision Time
Installing NTP
NTP (Network Time Protocol) is used to synchronize the clocks of networked computers. Install NTP on your Raspberry Pi:
sudo apt install ntpConfiguring NTP
Edit the /etc/ntp.conf file to set up the NTP server with GPS and PPS as time sources with some public NTP servers as a backup. Here is a sample configuration:
driftfile /var/lib/ntp/ntp.drift

# Leap seconds definition provided by tzdata
leapfile /usr/share/zoneinfo/leap-seconds.list

# Statistics
statistics loopstats peerstats clockstats
filegen loopstats file loopstats type day enable
filegen peerstats file peerstats type day enable
filegen clockstats file clockstats type day enable

# GPS: PPS GPIO via /dev/pps0
server 127.127.22.0 minpoll 4 maxpoll 4
fudge 127.127.22.0 refid PPS

# GPS: GPSD Clock via SHM
server 127.127.28.0 minpoll 4 maxpoll 4 prefer
fudge 127.127.28.0 time1 +0.120 refid GPS flag1 1

# Network fallback
server ptbtime2.ptb.de prefer
server ptbtime4.ptb.de prefer
server ptbtime3.ptb.de prefer

# By default, exchange time with everybody, but don't allow configuration.
restrict -4 default kod notrap nomodify nopeer noquery limited
restrict -6 default kod notrap nomodify nopeer noquery limited

# Local users may interrogate the ntp server more closely.
restrict 127.0.0.1
restrict ::1

# Needed for adding pool entries
restrict source notrap nomodify noquery

# Available to LAN
restrict 192.168.0.0 mask 255.255.255.0
You might need to adjust the GPS time offset (which is time1 +0.120 in my case). You can try to set this higher / lower so that the offset of your SHM compared to other NTP servers is as small as possible.
Finally restart the NTP service:
sudo systemctl restart ntp.serviceYour NTP server is now up and running.
Verifying NTP Sources
After a few minutes, check the NTP sources:
ntpq -p

     remote           refid      st t when poll reach   delay   offset  jitter
==============================================================================
oPPS(0)          .PPS.            0 l    4   16  377    0.000   -0.003   0.002
 SHM(0)          .GPS.            0 l    -   16    0    0.000   +0.000   0.000
*ptbtime2.ptb.de .PTB.            1 u   11   64  377   25.993   -0.700   1.733
+ptbtime4.PTB.DE .PTB.            1 u   53   64  377   24.899   +1.965   0.453
+ptbtime3.ptb.de .PTB.            1 u    6   64  377   25.589   +0.596   0.550
The output should show that PPS and GPS are being used as time sources, with public NTP servers as fallbacks.
Now our NTP server is officially a Stratum 1 NTP server which provides high precision time to our LAN devices. Simply use the hostname or IP of the Pi and the time can easily be synced.
Conclusion
Setting up a high-precision time server using a Raspberry Pi and a GPS module is not only an engaging project but also a highly practical one. This configuration has been running reliably in my network for months, providing accurate time to all connected devices. Whether for personal projects or ensuring precise timekeeping in your LAN, this guide provides a comprehensive roadmap for achieving high precision.
I also want to thank Johannes Weber and Austin Pivarnik for their great guides on how to setup a GPS based NTP server, which helped me a lot:
- https://weberblog.net/ntp-server-via-gps-on-a-raspberry-pi
- https://austinsnerdythings.com/2021/04/19/microsecond-accurate-ntp-with-a-raspberry-pi-and-pps-gps
Do you have questions or want to share your experience? Leave a comment below! Follow me on social media for more exciting projects and updates. If you need help with your own GPS time server setup, feel free to reach out!
This post was created with the support of artificial intelligence (GPT-4o). Curious how AI can create such texts and images from its own ideas? Learn more about it on the website of the Neoground GmbH - Your partner for AI-Consulting, web development, and digital strategies.


No comments yet
Add a comment