Since childhood, airplanes have held an incredible fascination for me. The elegant machines soaring high in the sky and the complex systems that keep them aloft have always impressed me. When I eventually discovered platforms like Flightradar24, FlightAware, and ADS-B Exchange, my curiosity was piqued: How does this technology work? And could I become part of this fascinating network myself?
Thus began my adventure with ADS-B antennas—a journey that started with simple initial experiments, led through exciting challenges, and culminated in the construction of a powerful groundplane antenna. In this blog post, I want to take you along on this journey, share my experiences, and show you how you can dive into the world of flight tracking yourself.
What is ADS-B and Why is it So Fascinating?
ADS-B, short for Automatic Dependent Surveillance-Broadcast, is a crucial component of modern air traffic surveillance. Aircraft equipped with an ADS-B transponder continuously broadcast their position, altitude, speed, and other important data to ground stations and other aircraft. These signals are sent out regularly and can be received by anyone with the appropriate equipment. This is where the fascination for tech enthusiasts like me comes into play: With a simple DVB-T stick and a small computer like the Raspberry Pi, you can receive these ADS-B signals and become part of the global surveillance network.
Since ADS-B signals are unencrypted and accessible to everyone, it is possible to receive them without much technical effort. This allows private individuals to use the transmitted data from aircraft and forward it to platforms like Flightradar24. These platforms, in turn, use the data to provide precise and up-to-date information about air traffic. For me, this was an exciting opportunity to satisfy my technical curiosity while also supporting the community.
First Steps: The Simple DVB-T Antenna
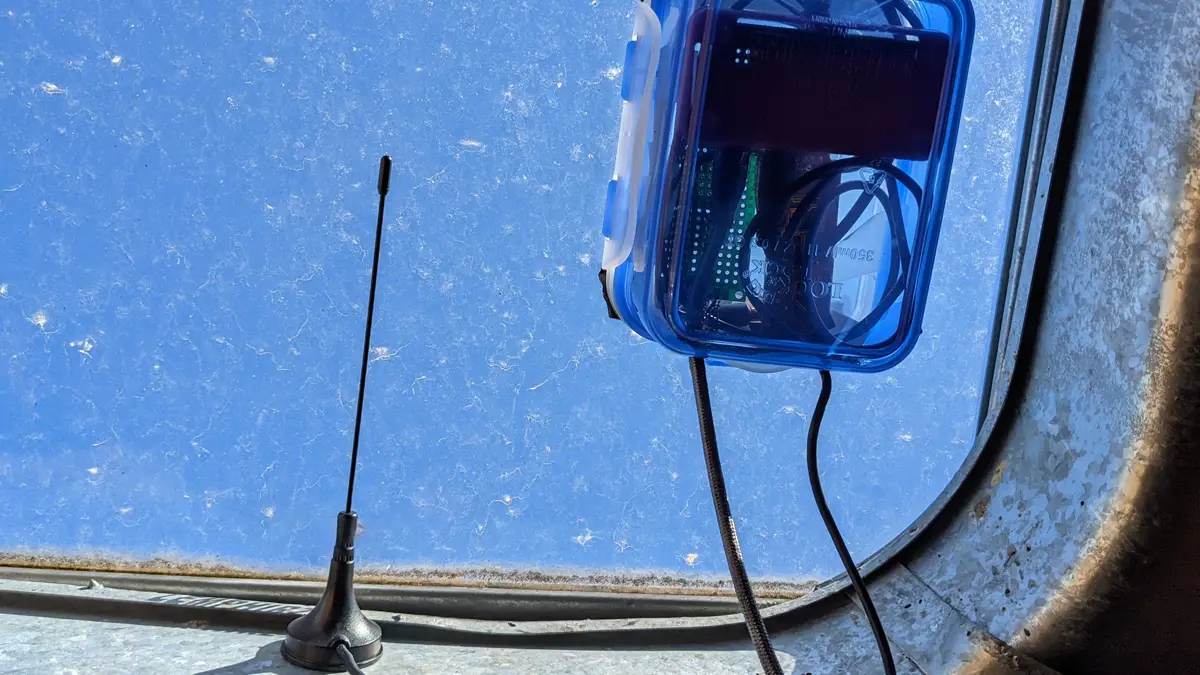
My first experiment in the world of ADS-B antennas began with what I had on hand: a small DVB-T stick that I bought for about 40 euros and the tiny antenna that came with it. Although this antenna is not specifically optimized for ADS-B, it’s sufficient to pick up initial signals. ADS-B signals are found at 1090 MHz, slightly above the DVB-T frequencies.
In principle, any DVB-T stick with the RTL2832U chipset should work. I use the Nooelec RTL-SDR with RTL2832U & R820T2, which can receive from 100 kHz to 1.75 GHz.
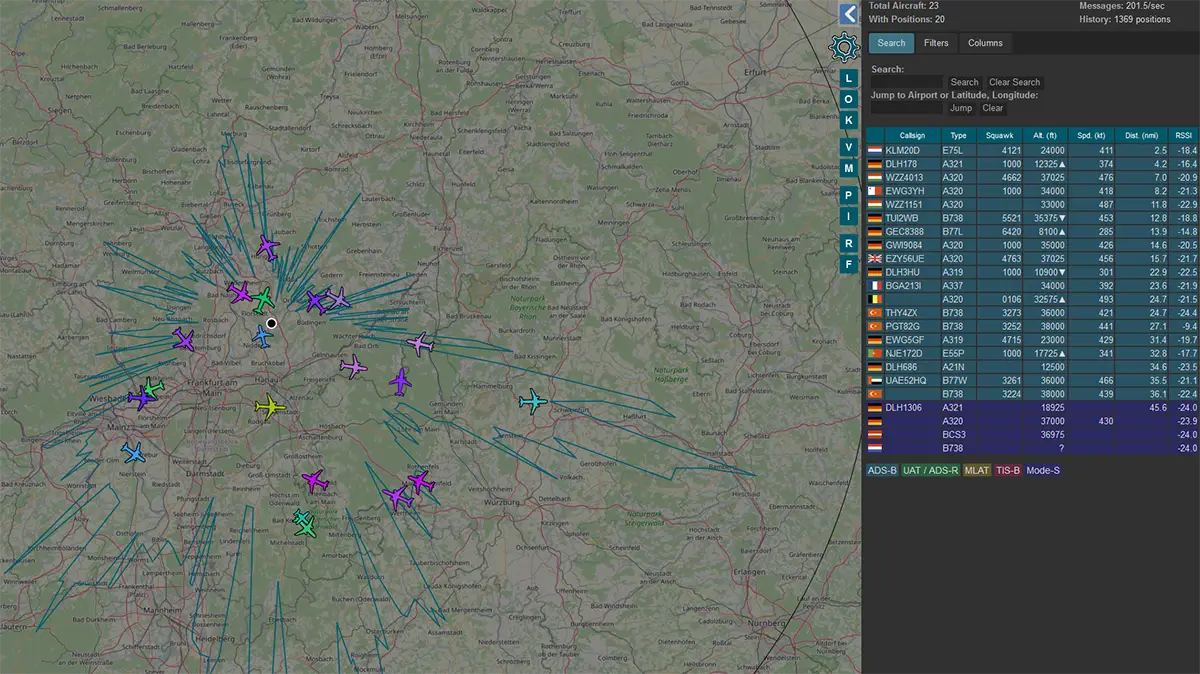
I attached the small magnetic antenna to the edge of a rooftop window and was surprised at how quickly I achieved my first successes. In a short time, my setup displayed around 20 airplanes in my vicinity. This was a good start, but I wanted more: greater range, a higher number of received planes, and overall better reception quality.
The Next Step: The G7RGQ Omni-Directional Antenna
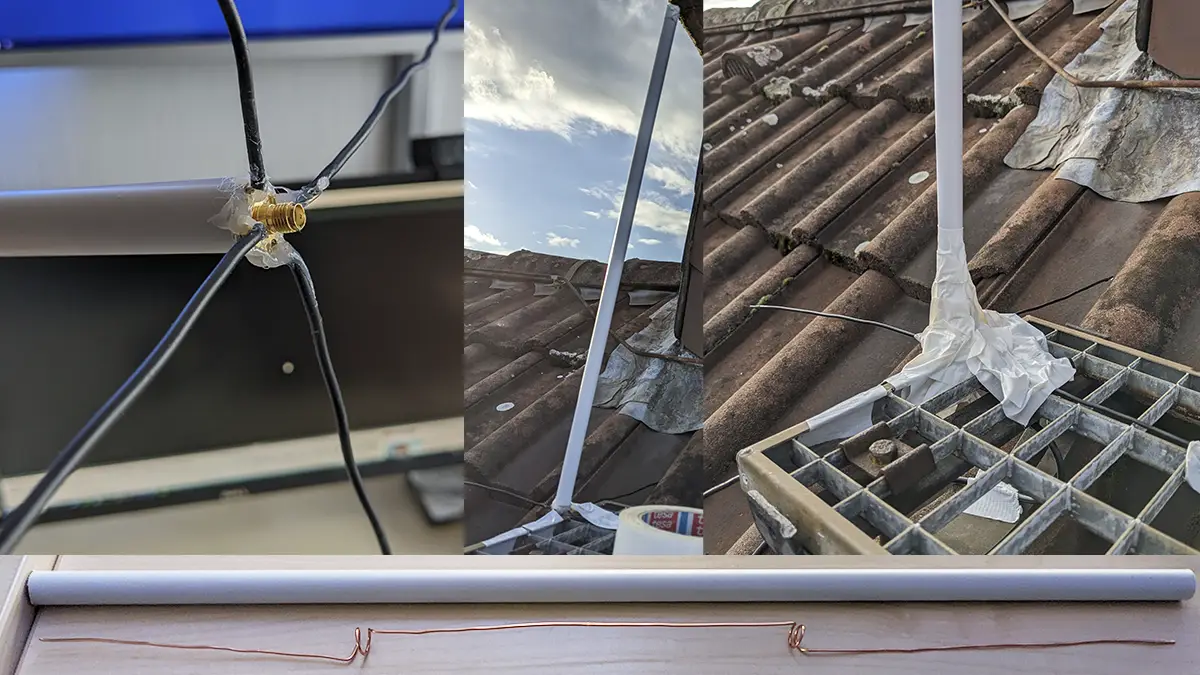
Looking for a way to improve my reception, I came across the Jetvision Wiki, where I found the building instructions for a so-called G7RGQ Omni-Directional Antenna. This antenna is specifically designed for receiving ADS-B signals and promises a significant improvement in reception quality.
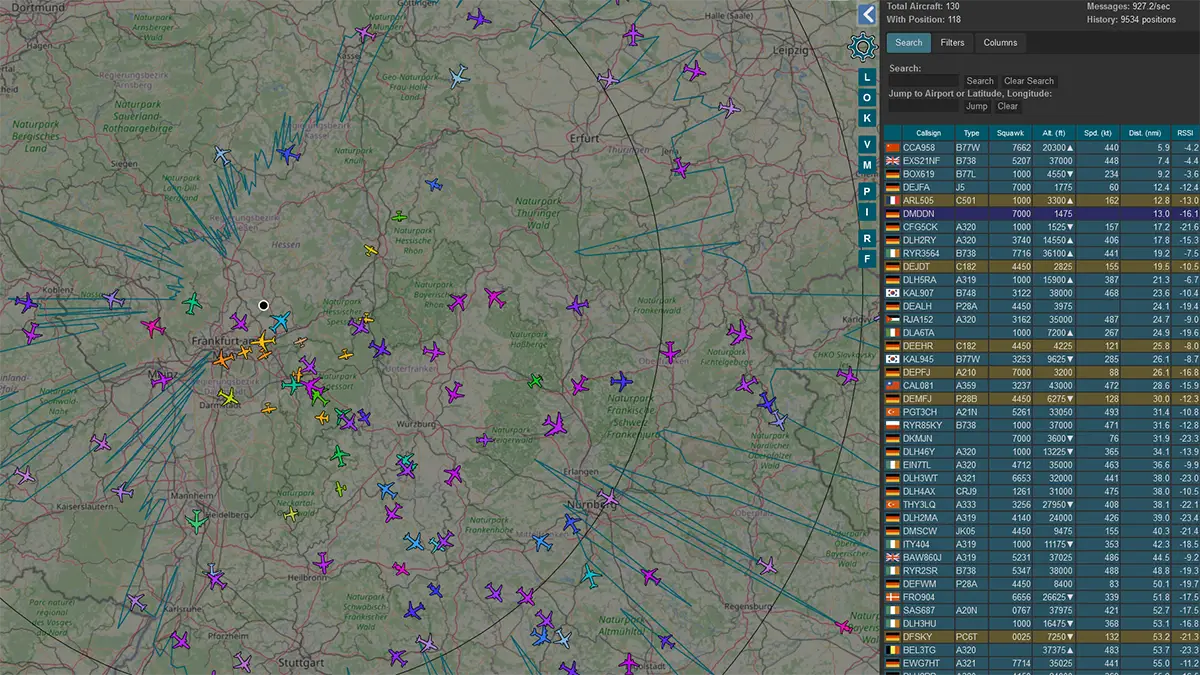
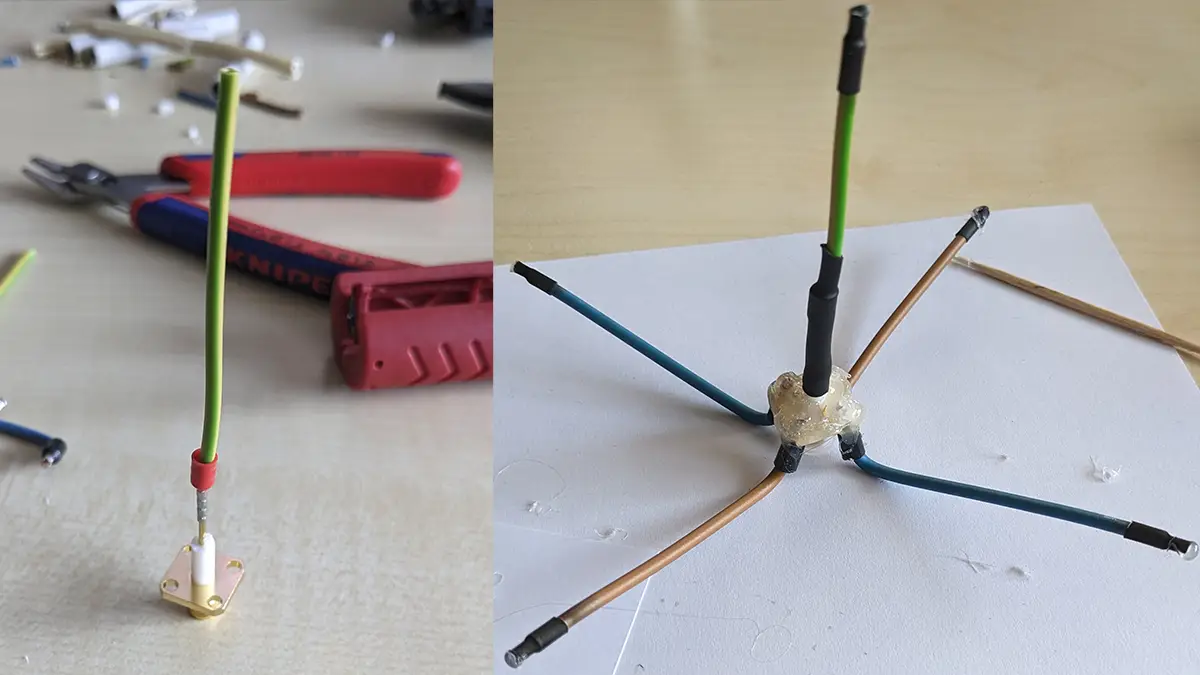
The instructions were easy to understand, so I set out to build my own antenna. Using solid copper wire, I shaped the elements of the antenna and soldered them onto a small SMA connector. I then mounted the finished antenna in a plastic tube and fixed it on my roof. The effort paid off: reception improved significantly, and on an average afternoon, I could now receive around 120 to 130 airplanes simultaneously.
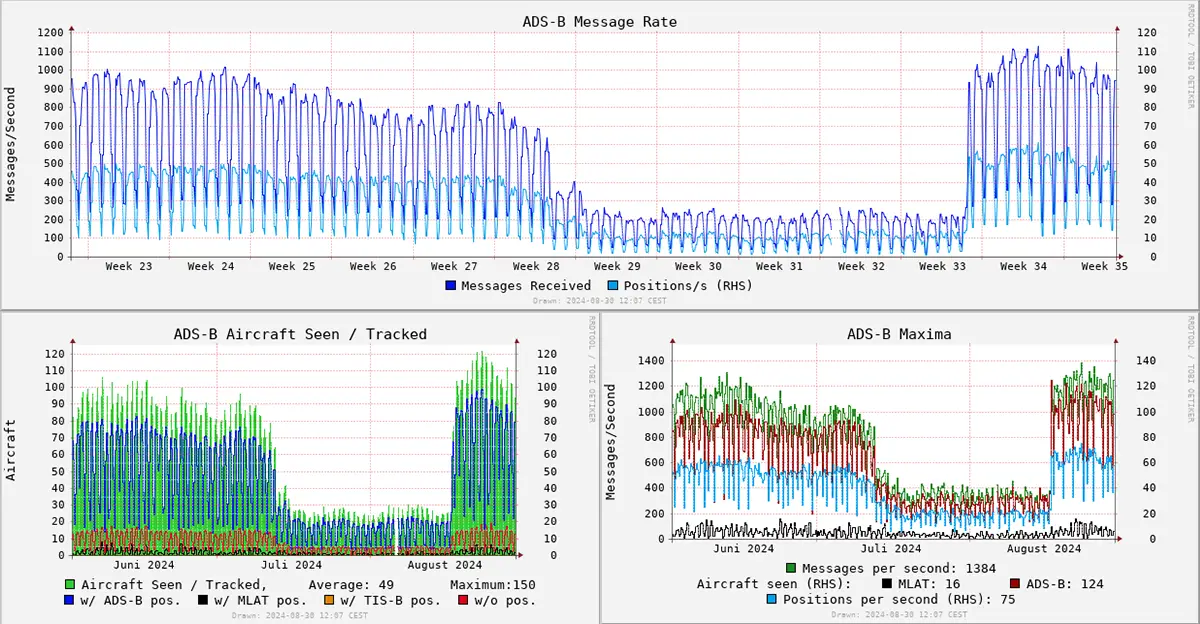
The range was particularly impressive to the east and south. Aircraft up to 150 nautical miles away could be detected. However, summer brought some challenges: Particularly severe thunderstorms and storms, which seem to be intensifying due to climate change, took their toll on my antenna. After one storm, the antenna was slightly bent, noticeably affecting reception quality (as clearly seen in the graph below, where reception weakened from week 26 onward). I was initially satisfied until another storm with over 40 liters of rain per square meter and hail nearly destroyed the antenna. Weeks later, when I inspected the roof, I found only the radials and the connector—the main antenna had simply disappeared, blown away.
Despite this setback, it was surprising to see that even with the remnants of the antenna, some aircraft could still be received (clearly visible in weeks 28 to 33). However, it was clear that a new solution was needed, with success already hinted at the end of the graph.
A Surprising Success: The Groundplane Antenna
After my self-built omni-directional antenna was destroyed by the storm, I searched for a quick and inexpensive replacement. Having gained some experience by now, I decided to build a simple groundplane antenna. This antenna consists of a central radiator and four radials, all about 6.8 cm long and made of solid copper wire. I fixed the elements with hot glue—simple, but effective. A good tutorial can be found on the Amateur Radio Blog: Groundplane Antenna DIY.
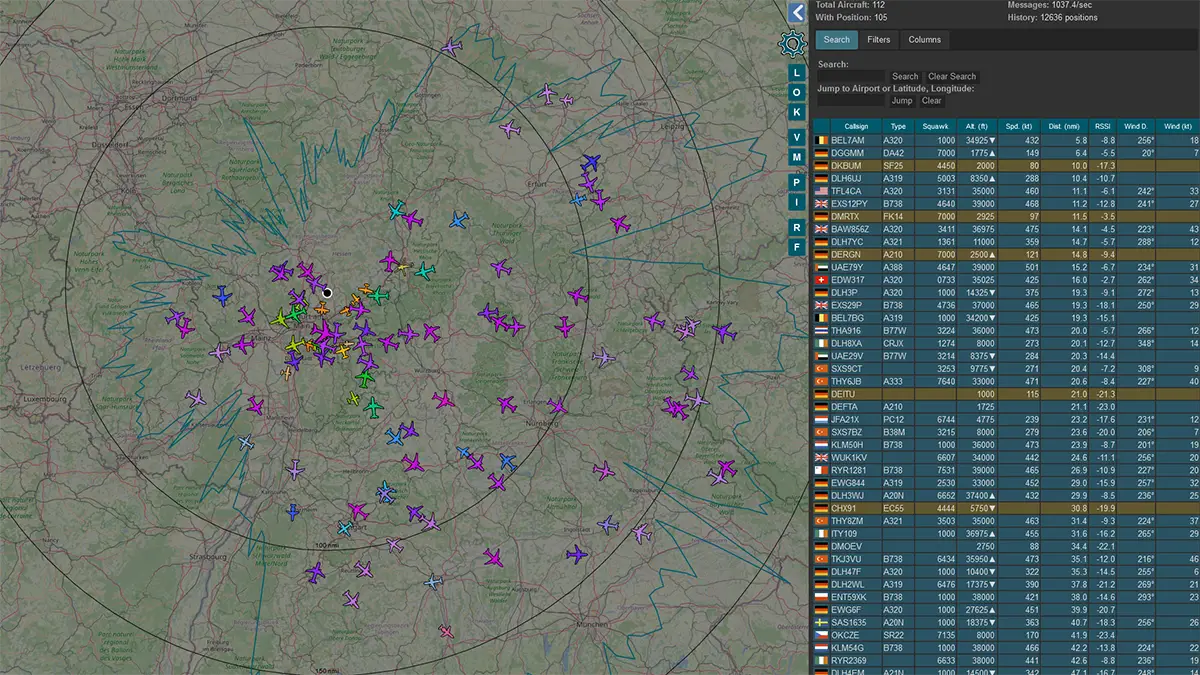
I mounted this antenna temporarily with duct tape on my roof and connected it to my RTL-SDR stick. The result was astonishing: the reception quality was even better than with the much more complex G7RGQ antenna. The numbers spoke for themselves: in my setup, I was now able to achieve a higher ADS-B message rate and track a greater number of aircraft. In Tar1090, my local radar solution, I could see on the map that I was now receiving aircraft up to the southern German border, into Switzerland, and near Luxembourg, as clearly shown in the screenshot. Although my roof still blocks reception to the north and west, the results were so impressive that I decided to build another, more precise version of this groundplane antenna. This version will be fixed to the chimney, providing an unobstructed 360-degree view for optimal reception. But that’s a project for next year.
The graph above clearly shows that this antenna further improves reception (from week 33 onward).
On a typical weekday, my radar now looks like this:
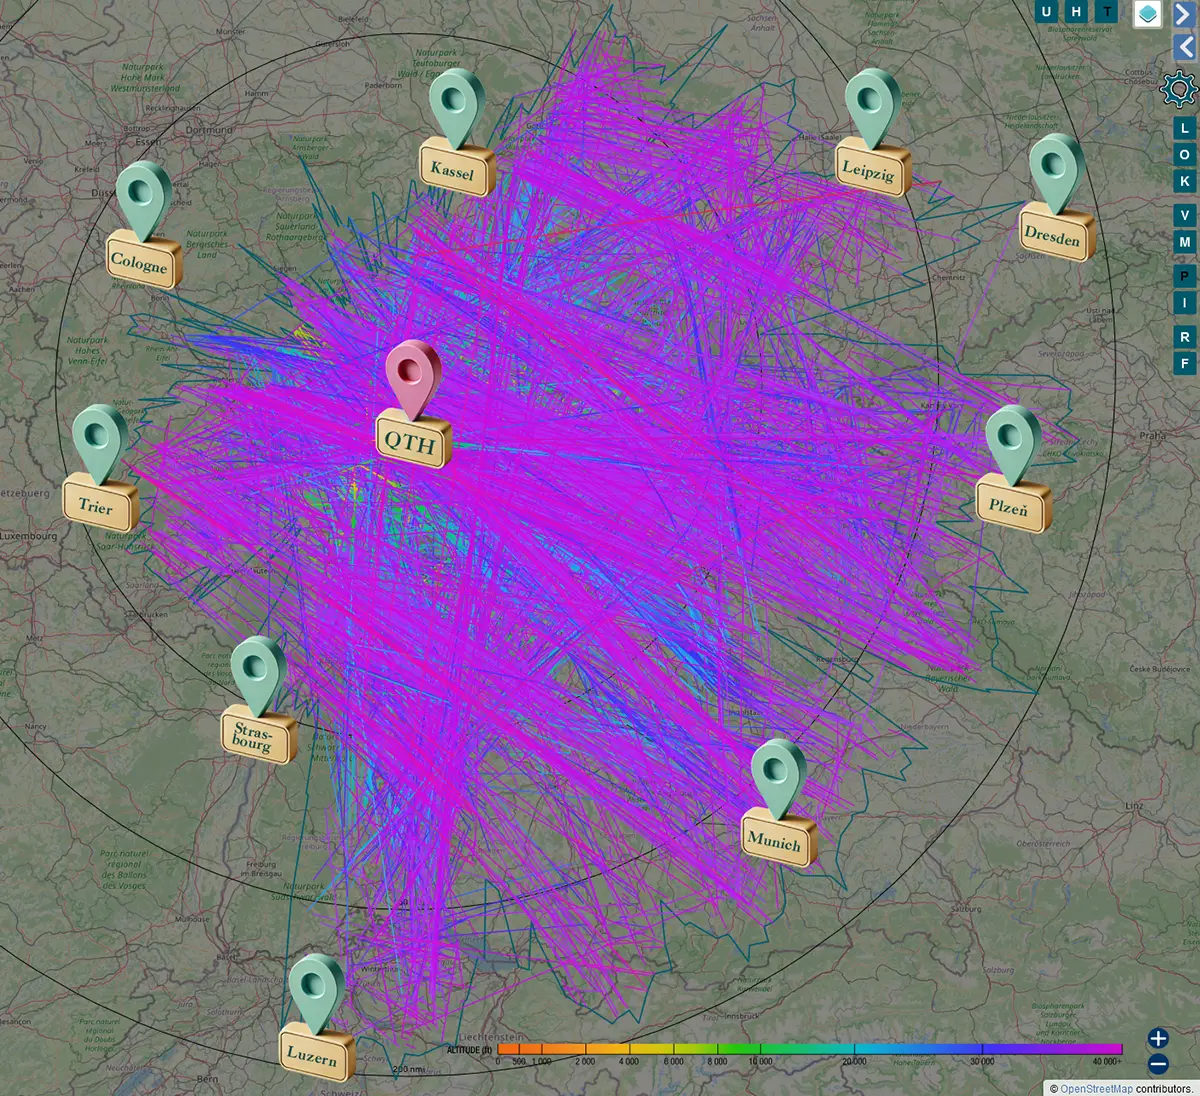
And with plotted tracks of the tracked aircraft, you can clearly see the reception area:
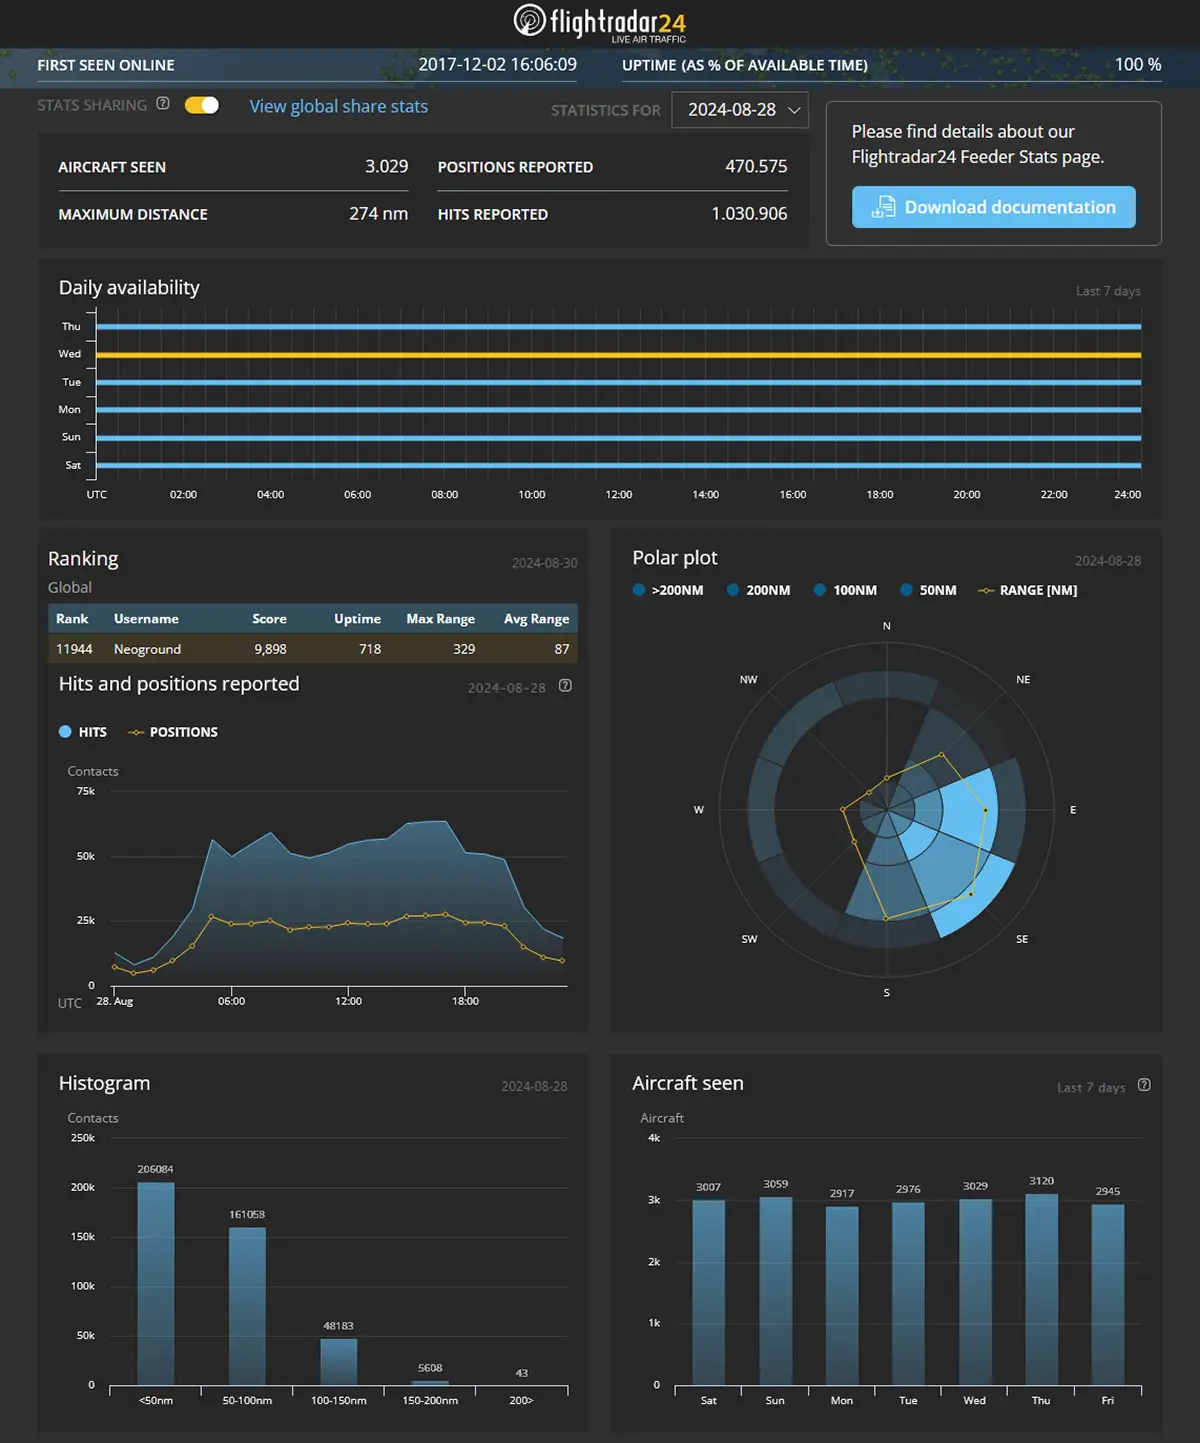
And even the statistics from Flightradar24 are convincing:
The Software: The Heart of My ADS-B Setup
Of course, hardware is only half the battle. To efficiently use and analyze the received signals, the right software is crucial. For my ADS-B setup, I use a Raspberry Pi 3B+ (although the Raspberry Pi Zero works, its hardware is quite limited. On my Zero WH, the analysis ran somewhat decently but with nearly 100% load, whereas the 3B+ is much better suited. However, I don't have comparison data for the new Zero 2). The Raspberry Pi runs Raspberry Pi OS, a Debian-based operating system. The DVB-T stick is plug-and-play; after installing the feeder software, I can immediately use the received ADS-B signals.
I’ve refined my software stack over the years. It currently includes the following components:
- readsb: This software reads the ADS-B data and makes it available to the system.
- tar1090: A local radar that can be accessed via a web browser and offers a similar interface to ADS-B Exchange, allowing me to monitor my air traffic live.
- graphs1090: This software generates graphs that visualize the reception quality of my antenna.
- fr24feed: A feed client that forwards the received ADS-B data to Flightradar24.
- axfeed: A feed client that forwards the received ADS-B data to ADS-B Exchange.
- ntp: A time service that synchronizes the system time with time servers—particularly important if you use MLAT (Multilateration), as precise timing is required. For utmost precision, you can also connect a GPS receiver to get microsecond-accurate time. See also my guide: High-Precision Time with GPS on a Raspberry Pi.
- nginx: A web server that serves the content of tar1090 and graphs1090. Simply install the full package via
sudo apt install nginx-full.
Installation and Configuration
Flightradar24 Feeder
If you want to forward your data to Flightradar24, installing the fr24feed client is the first step. Here’s my approach, based on Wiedehopf’s guide:
sudo adduser --system --no-create-home fr24
sudo rm /tmp/fr24 -rf
mkdir -p /tmp/fr24
cd /tmp
sudo wget -O fr24.deb https://repo-feed.flightradar24.com/rpi_binaries/fr24feed_1.0.37-0_armhf.deb
sudo dpkg -x fr24.deb fr24
sudo cp -f fr24/usr/bin/fr24feed* /usr/bin
sudo wget -O /etc/systemd/system/fr24feed.service https://raw.githubusercontent.com/wiedehopf/adsb-scripts/master/fr24feed.service
sudo systemctl enable fr24feed
sudo systemctl stop fr24feed

sudo touch /etc/fr24feed.ini
sudo chmod a+rw /etc/fr24feed.ini
My configuration file /etc/fr24feed.ini looks like this:
receiver="beast-tcp"
host="127.0.0.1:30005"
fr24key="YourFr24SharingKey"
bs="no"
raw="no"
logmode="0"
windowmode="0"
logpath="/var/log/fr24feed"
mpx="no"
mlat="no"
mlat-without-gps="no"
The status of the FR24 feeder can be seen in the browser at http://ip-of-your-pi:8754. After installing all packages and configuration the feeder should show beast-typ, Connected as the receiver.
Wiedehopf Packages
To install the other components by Wiedehopf (readsb, tar1090, graphs1090, and the ads-b exchange feeder), I use the following commands:
# Install readsb (reconfigures fr24feed automatically)
sudo bash -c "$(wget -O - https://github.com/wiedehopf/adsb-scripts/raw/master/readsb-install.sh)"

# Set your location
sudo readsb-set-location 50.1106 8.6822

# Install tar1090
sudo bash -c "$(wget -nv -O - https://github.com/wiedehopf/tar1090/raw/master/install.sh)"

# Install graphs1090
sudo bash -c "$(curl -L -o - https://github.com/wiedehopf/graphs1090/raw/master/install.sh)"

# If you want to feed to ads-b exchange, install their feeder
curl -L -o /tmp/axfeed.sh https://www.adsbexchange.com/feed.sh
sudo bash /tmp/axfeed.sh

# Finally reboot your system
sudo reboot
Once the ADS-B Exchange feeder is installed and configured, you can check whether the data is being transmitted correctly by visiting https://adsbexchange.com/myip. Make sure to access this page from the same internet connection that the Raspberry Pi is using to transmit the data. Additional statistics can be viewed there if the axstats package is installed. Since my primary focus is on a local solution and I already have extensive analysis tools with tar1090 and graphs1090, I am currently not using this package.
Automatic Gain Adjustment
To further optimize reception quality, I use the auto-gain script, which automatically adjusts the gain of my RTL-SDR stick. For more information, see Wiedehopf’s documentation: Automatic gain optimization for readsb and dump1090 fa.
This script runs on my pi every night at 3:30 AM and I'm always pleased with the reception quality.
Nginx Configuration
To make tar1090 and graphs1090 accessible over the network, I add two lines to the default nginx configuration /etc/nginx/sites-enabled/default:
server {
    # My existing config...
    listen 80;
    # ...

    # Append this
    # Include tar1090 + graphs1090
    include /usr/local/share/tar1090/nginx-tar1090.conf;
    include /usr/share/graphs1090/nginx-graphs1090.conf;
}
You can now view your radar at http://ip-of-your-pi/tar1090 and the reception graphs at http://ip-of-your-pi/graphs1090.
For further details and troubleshooting, I recommend the comprehensive guides and documentation of Wiedehopf’s projects. They are well-structured and offer valuable support, such as the Guide for ADS-B Reception with a Raspberry Pi.
Conclusion: My Path to the Perfect ADS-B Antenna
My adventure with ADS-B antennas not only brought me closer to the fascinating world of flight tracking but also showed me how much fun it can be to tackle technical challenges. From the humble beginnings with a simple DVB-T antenna to the robust groundplane antenna, every step was a new learning experience. Especially the integration of the software on the Raspberry Pi has enabled me to efficiently process my data and achieve an impressive reception range.
Are you also interested in flight tracking or similar projects? I’d love to hear about your experiences. Feel free to share them in the comments or connect with me on my social media channels. If you enjoyed this post, share it with others and help us grow the community!
This post was created with the assistance of artificial intelligence (GPT-4o). The illustrations are AI-generated. All photos and screenshots were taken by me. Curious about how AI can create such texts and illustrations from your own ideas? Learn more about it on the Neoground GmbH website.


Noch keine Kommentare
Kommentar hinzufügen